World Machine to Unreal Engine 4 - In Depth Guide
In this guide I will go through setting up a basic terrain generation network in World Machine, along with weightmaps, exporting that landscape from World Machine and importing it into Unreal Engine 4.
I am going to assume you are using the Basic Edition of World Machine.
Contents
A Few Notes About Scale
In the Unreal Engine 4, 1 unit is 1 cm, so 100 units is 1 meter.
A landscape at 100% on the Z axis has a total range of 512meters. 25700.0 to -25500.
The maximum dimensions you can export from World Machine Basic edition that are compatible with UE4 are 505x505.
Which at 100% on the X and Y axis, will give you a landscape which is 25200uu in each direction, (504x504m).
I've seen quite a few people suggesting multiplying your elevation by whatever number, but its completely illogical and you're just making more work for yourself.
The only reason I can see for people doing this is that they are using the World Machine default projects maximum elevation of 2625 m.
Change it, make it a multiple of 512. It will make everything a lot easier.
Say you set the maximum elevation in World Machine to 2048, that would make your terrain 2048 meters tall on the Z axis. So in unreal, this is simply 400%.
If say you wanted a landscape with a maximum elevation of 5km, you could set your maximum elevation in World Machine to 5120. Then when importing to UE4, you would use 1000% vertical scale.
It's as simple as that.
That being said, using a large Z scale will increase landscape stepping regardless of your source image bit depth.
As for the X and Y axis. I find its best to keep these at 100%, 200%, 400% or whatever. A scale of "743.6787307992955" to me is just nonsensical.
A landscape size of 505x505, is... 504 meters square. Near as dammit to being 1meter per pixel.
So. If you want a terrain of 1km in a single file you would create a terrain in World Machine with a resolution of 505x505. Then a width and height of 1.01km
The detail scale will be 2m per pixel.
Then in UE4, you would set the X and Y scale to 200%.
World Machine Project Settings
Let's go ahead and set up World Machine to work well with UE4.
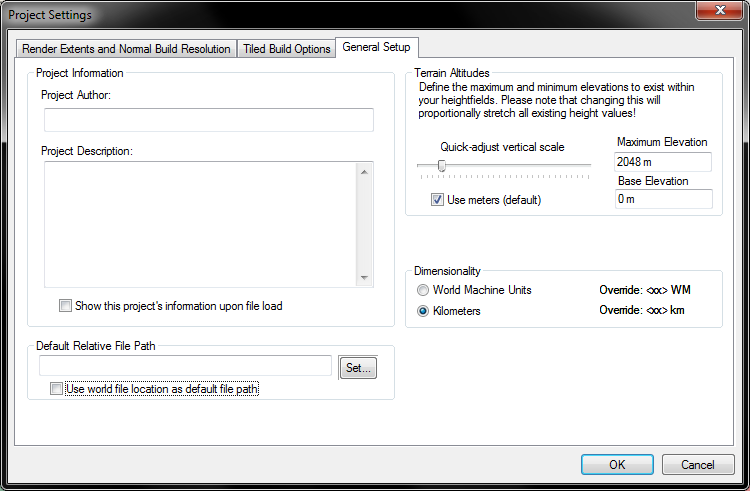
In World Machine open up the "Project Settings" page. Set the width and height to 505x505 m, with a Normal Build Resolution of 505x505.
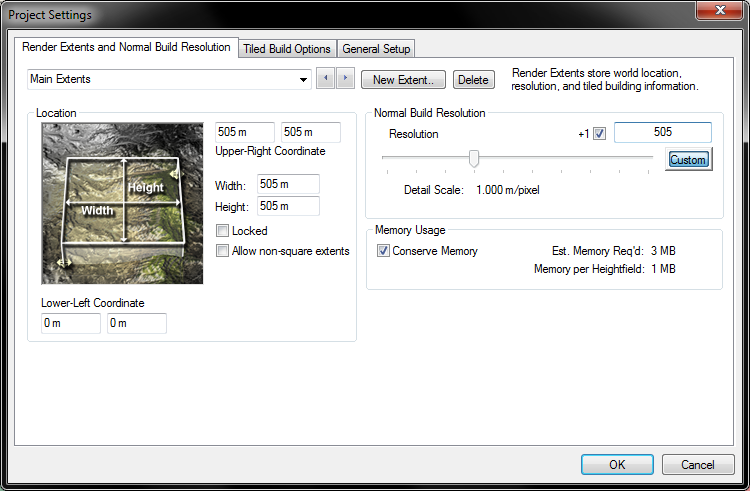
Then on the "General Setup" tab. Adjust the maximum Elevation to 2048m.
Note: The reason I use 2048 meters is because when scaled to 400% in UE4 it will be 1:1 scale and will be about the maximum vertical scale before landscape stepping occurs. Also, 400% is a nice round number.
Next we will set the water height, I use 512m. This gives me plenty of underwater headroom, and still allows for pretty tall mountains. It's also 1/4 of the maximum elevation so it makes calculating the water plane Z location easier in UE4.
Generating Elevation
First of all, I think it's important to save your project in its own folder. Then create a folder within that folder for file outputs, this helps keep track of things. I generally use a folder called "Out". Make sure you create this in your project folder before continuing.
Once that's done you can go ahead and set up your landscape generation ready for exporting to UE4. For this tutorial I will keep the generation simple and just focus on the file formats and weight map exporting.
First we will take an Advanced Perlin, Terrace it, then Erode it. Then we will plug-in a Height Output to export the base heightmap.
You should end up with something looking like this.

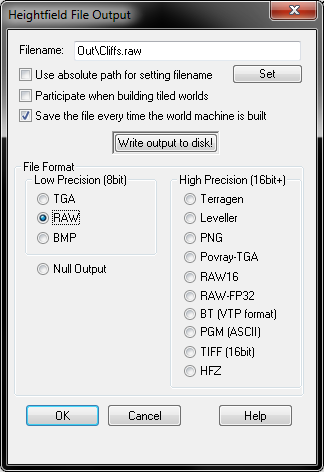
In order to get the base heightmap exporting correctly, double click on the Height Output node and set its properties as follows.
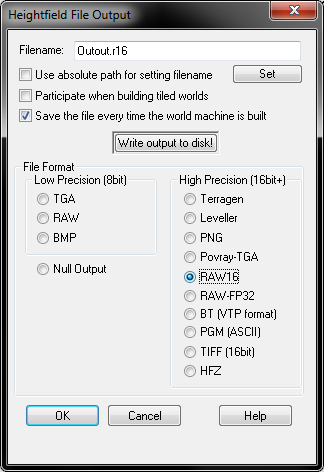
Not using an absolute path ensures that the file will be saved in the same location you saved your World Machine project file. (If you haven't done so, do so now.) (Best to keep it in its own folder)
Now if you press the green button on the toolbar, it will build and export this file ready for use within UE4.
But we're not done yet. If we want to have varying textures placed in logical locations around our landscape, we will need some weight maps.
Creating and Exporting Weightmaps
To keep this fairly simple, we are going to create five layers.
Cliffs
Dirt
Plains
Waterbed
Flowline
Lets start with the Cliffs. Connect a "Select Slope" node to the Primary Output of the Erosion node, then connect a "Height Output" node to that.
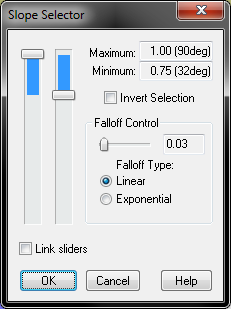
Then go ahead and double click the "Slope Selector" node, and set the options as follows.
Here we are selecting steep angles on the landscape and outputting these to a greyscale image. This image is what defines the placement of this layer later on in UE4.
Double click on the Height Output to set its properties, and set them as follows.
Make sure the File Format is Low Precision RAW. We use 8bit because we don't need as much precision. Also make sure you set the output file a logical unique name and that it creates itself within the "Out" folder as mentioned earlier.
Now we will do the same for the remaining layers.
Create a height output for the Dirt, Plains, Waterbed and Flow line layers.
For the Dirt layer, add a Select Slope node.
For the Planes and Waterbed, add two separate Select Height nodes.
Connect all of them except for the flow line layer to the Primary Output of the Erosion node. Connect the flow node to the "Flow Map" output of the Erosion node.
You should end up with something like this
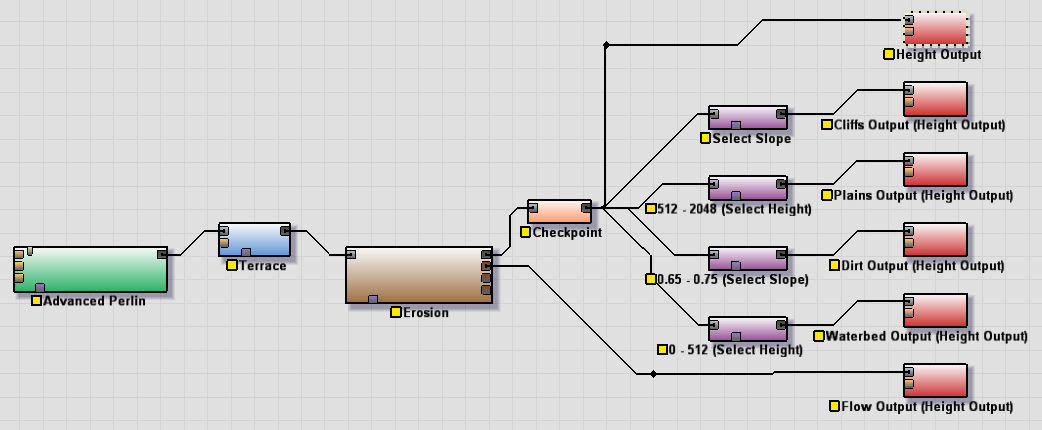
For the Dirt layer, set the Select Slope to 0.65 - 0.75. As seen in the picture above.
For the plains layer you would use a "Select Height" node to select everything above the water level. Double click the Select Height node and set the maximum to 2048 and the minimum to 512m, and the falloff to 0.
Do the same for the waterbed layer, except set the height for the underwater to be the opposite of the plain layer Height Select. 0m - 512m.
Then you can simply connect the flow output to the Erosion nodes Flow map output, as seen above.
Now when you press the green button in the toolbar, it will export your base height map, as well as the five different weight map images we just set up. Ensure you have given them all unique and logical filenames and set the file format correctly, then go ahead and hit that big green button!
Now we are ready to get this all into Unreal Engine 4.
Importing Landscape to UE4
First things first. In order to view the weightmaps in UE4, we need create a material. For this example I will show you how to set up the most basic material, simply to visualise our weightmaps.
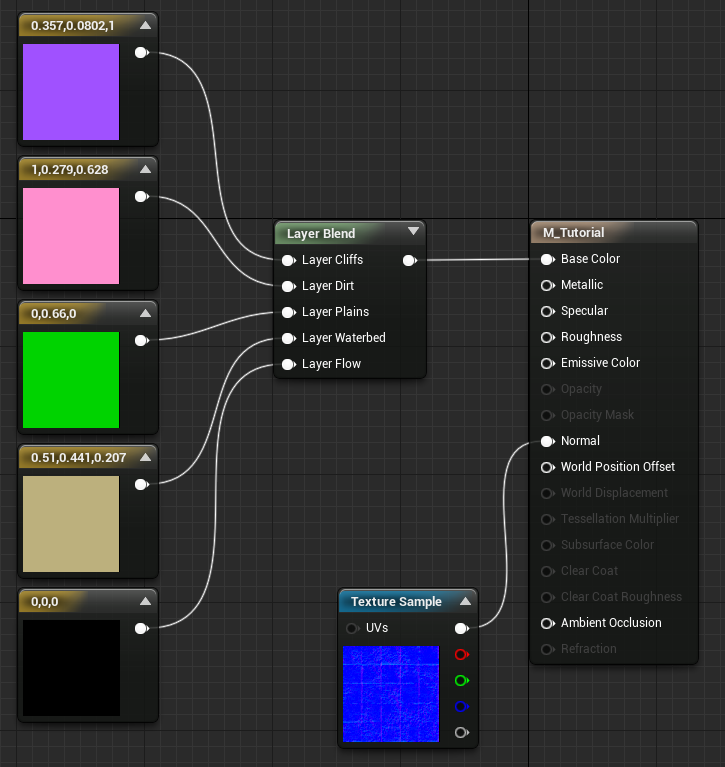
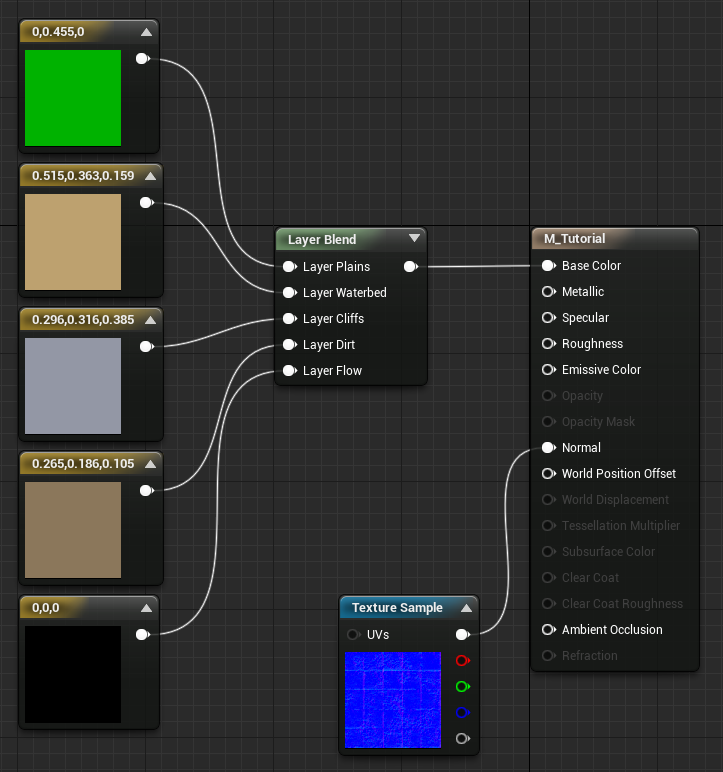
First, create five "Constant3Vector" nodes and set each one to a completely different colour that you are able to tell apart.
Then add a "LandscapeLayerBlend" node, and under its details pane, use the Plus symbol to create 5 layers. Name them "Cliffs, Dirt, Plains, Waterbed and Flowline"
Then you can go ahead connecting the Constant3Vector's we created previously to the LandscapeLayerBlend, and then connect that to the Base Colour. Lastly, for the sake of being able to tell you are moving on large terrains when playing in editor, add a texture sample using the texture "DefaultNormal" and connect it to the Normal Output in the material. That's all we need material wise for now. You should end up with something like this.
Apply and Save your material.
Finally, lets get to importing the landscape. This is where it all comes together.
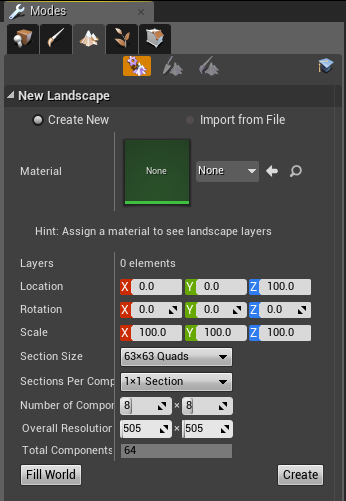
In the modes panel in the UE4 Editor, Select the Landscape tab (Shortcut: Shift+3)
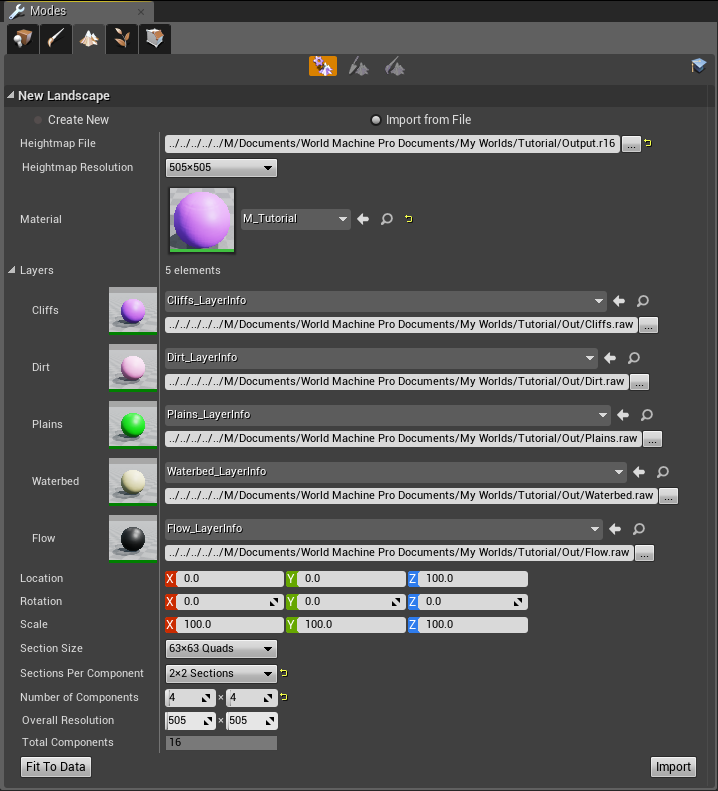
Tick import from file. Click the button with the three periods. Browse to your base height map file. (The .r16 one) When its selected you should notice that it sets the correct sizes for the landscape below. If not, then your landscape resolution is set wrong in World Machine. Recommended Landscape Sizes
Next you should select the material we just created. Click the drop down arrow next to the material and type the name. Or, with the material selected within the Content Browser, simply click the arrow. Once its selected you will notice that the layers rollout appears, it should say "5 elements" Open that and click the plus arrow next to each layer in order to create the "Layer Info" and select a "Weight Blended Layer (Normal)" Choose where to save it and hit OK. These are best saved in one of two locations, either within the current maps folder, or within a LayerInfo folder. If you use the latter, they are more easily reused.
Once you have created a LayerInfo for each layer, you need to select the height file exported from World Machine for each Layer. They should all be found in the out folder within your World Machine project folder.
Your Landscape Mode Panel should now look something like this.
The last thing to do before pressing import is to set the Z scale to 400% to make it match with the maximum elevation we set in our project settings in World Machine earlier. Remember, if you set your landscape size to anything other than 505x505 meters, you should adjust your X and Y scale accordingly. Of course, only if you are using a resolution of 505x505.
So... You've imported your landscape, but you may notice you can't see your Cliffs or Dirt slopes! Fear not!
The reason for this is the material's layer blend. Whichever layer is last will always be on top. So, essentially, your grass is covering both your Cliff and Dirt layers. Reordering them fixes this issue. I thought it was important to highlight this. Please note however, that the order doesn't affect hand painting layers.
So, after reordering your landscapelayerblend node, you will need to reimport your landscape. Make sure to select the correct file and layerinfo for each layer and reimport. (I think there is a bug with reimporting a terrain file, where you need to reapply your material to the landscape manually. So if your material still looks wrong, reapply it to the landscape via the Details panel)
So here is the result in UE4
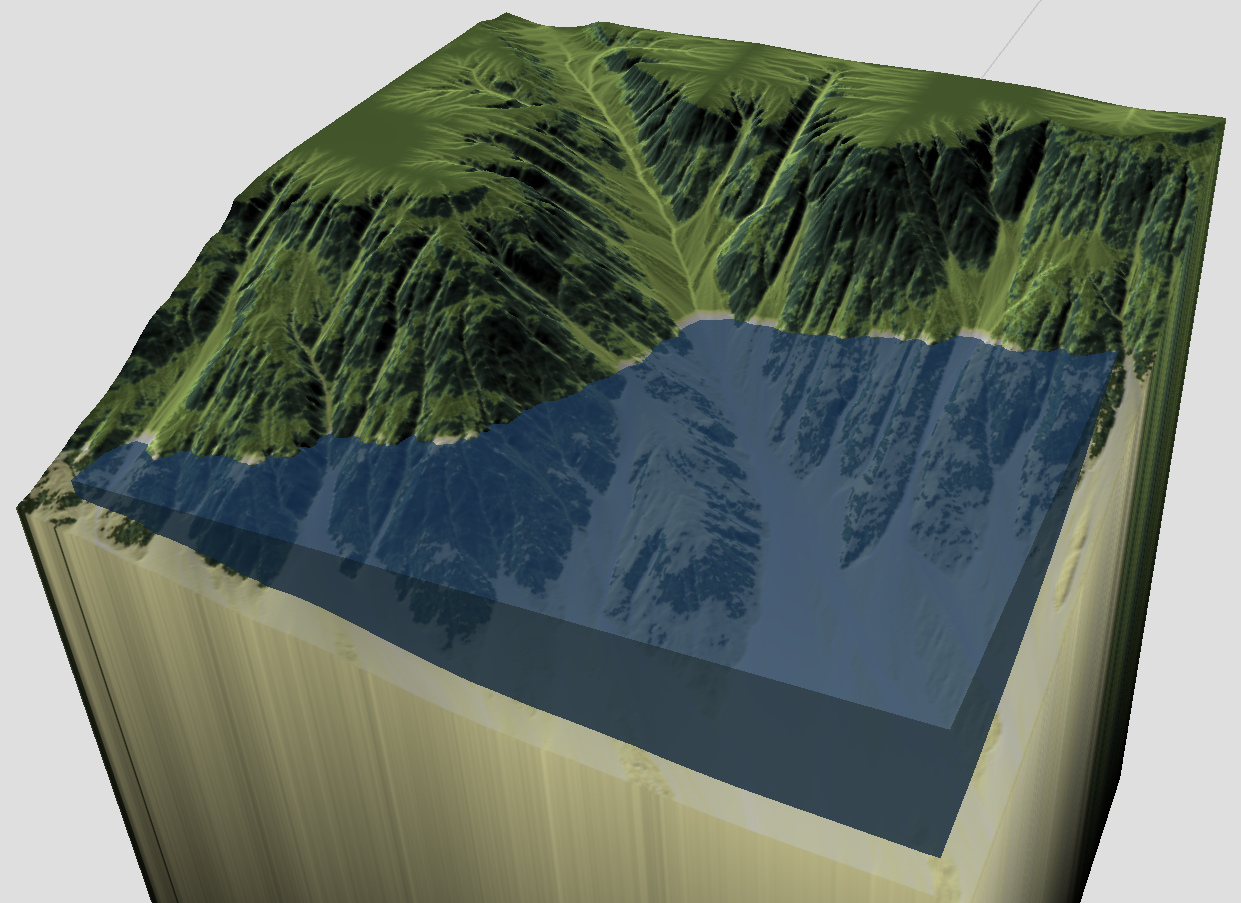
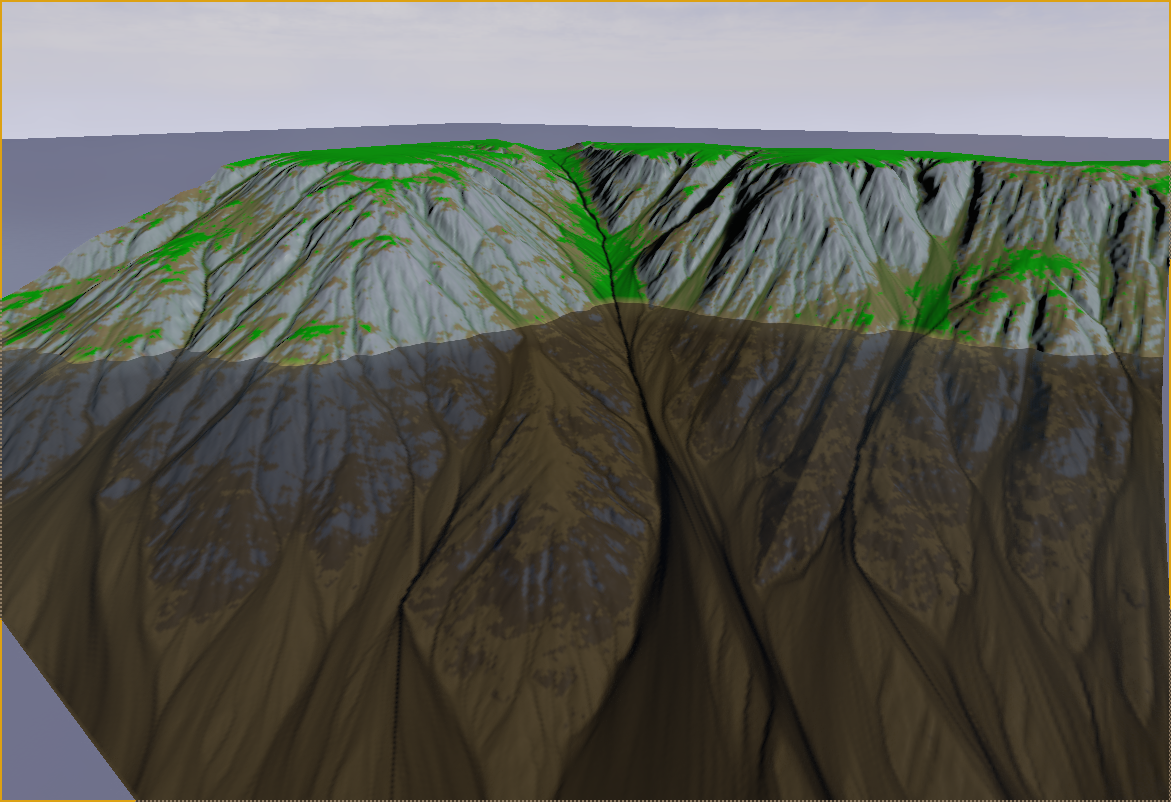 And here is the result in WM
Notes
More to come!
