Blueprint Basic Multiplayer HUD
Template:Rating Template:Warning
Contents
- 1 Overview
- 2 Purpose
- 3 Blueprint Basic Multiplayer HUD
- 3.1 Expectations
- 3.2 Setup
- 3.3 Adding The Blueprints
- 3.4 Creating The Levels
- 3.5 Project Settings
- 3.6 The Game Mode Blueprint
- 3.7 Setting Up The Textures, Font and Materials
- 3.8 The Player Controller Blueprint
- 3.9 The HUD Blueprint Variables And Functions
- 3.10 The Main Menu Level Blueprint
- 3.11 The Lobby Level Blueprint
- 3.12 The HUD Blueprint Graph
Overview
In this tutorial I will show you how you can make a basic multiplayer HUD for testing and prototyping your game. It will include how to make a basic Main Menu that you can host or join a game by IP address, a "Lobby" to wait for players before starting the game and finally a transition to the actual game level.
Purpose
I am writing this tutorial because I was having a difficult time understanding how to make a basic main menu and getting players all into a level all at the same time. By default if you use the shortcut way, you start up the listen server and then the server may have a couple minutes to get a head start on the other players by the time they get joined up. This is not good for racing or other type game modes where it depends on the players all starting at the same time. I wanted to share a way to make that possible. All in blueprints!
While it may not be the best solution, It works for quickly prototyping and for working around the current blueprint limitations. I know a lot of changes are coming in this area in the future to make this all easier. But, I hope what you learn today will give you an Idea of what you can do with blueprints with a little creativity. So, lets get started!
Blueprint Basic Multiplayer HUD
Expectations
I consider this to be an intermediate tutorial. If you are struggling with some of the concepts please review some of the excellent tutorials on blueprints. I really learned a lot from the introduction to blueprint video series. Beginner blueprint tutorials - https://www.youtube.com/watch?v=cRhWc2kAhqI&list=PLu7QoDvtZjr0d81niiZahZk0pfO3sJq1U
This is current with 4.2.1 running the WIN64 editor. Italic text
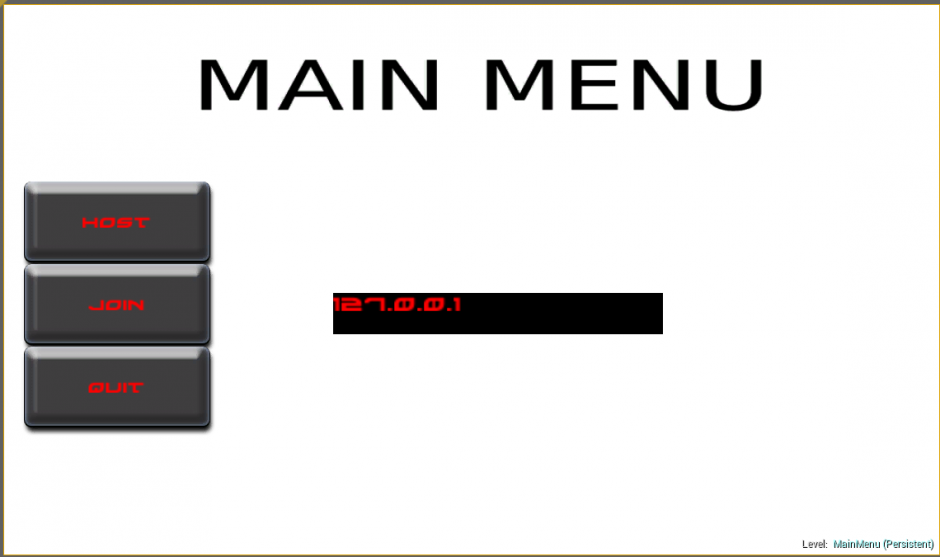
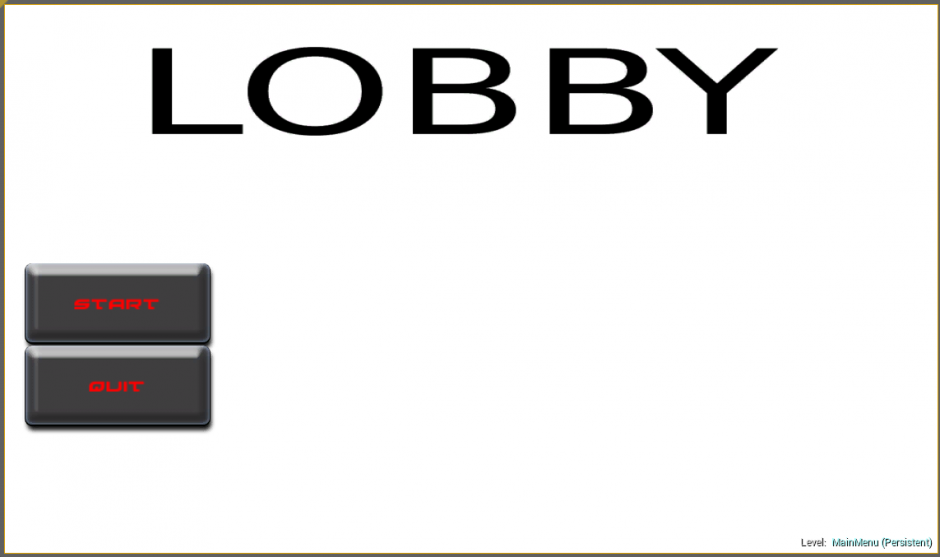
I am going to start off with a couple of images to give you an idea of where this tutorial will end up.
Setup
I recommend you start with a completely blank blueprint project(no starting assets) on the first run through this tutorial. This will avoid having any extra clutter and allow you to see only the parts that makes this all work.
That being said there are a couple of things that we need in addition to that:
- A menu background image
- A lobby background image
- A button image
- A button image when it is pressed down.
I made a simple menu background and lobby background in the free image program GIMP 2 and the buttons were taken from the content example blueprint HUD.
Adding The Blueprints
We will need a few blueprints created:
- Create a GameMode class blueprint.
- This defines the classes we use in the HUD.
- Create a HUD class blueprint
- This is where most of the HUD logic is contained.
- Create a PlayerController class blueprint.
- This is where the control is handed over to the HUD.
- Create a Pawn(not DefaultPawn) class blueprint.
- This is a pawn without a movement component. Since there is only need for a mouse in the menu.
- Create a second GameMode class blueprint.
- This will be the GameMode blueprint that is switched to when the game actually starts.
TODO: Expand on how to do this.
Creating The Levels
We will need 3 levels total for this tutorial.
- MainMenu(Where you can choose to host or join a game) - This is an empty level.
- Lobby(Where the host can wait for clients to join) - This is an empty level.
- GameLevel(This is the level that will load when the host presses start) - This level will need player starts etc.
- Click on World Settings and Set the GameMode Override to your second GameMode blueprint, this will allow you to use a different game mode on this map instead of the HUD game mode.
Project Settings
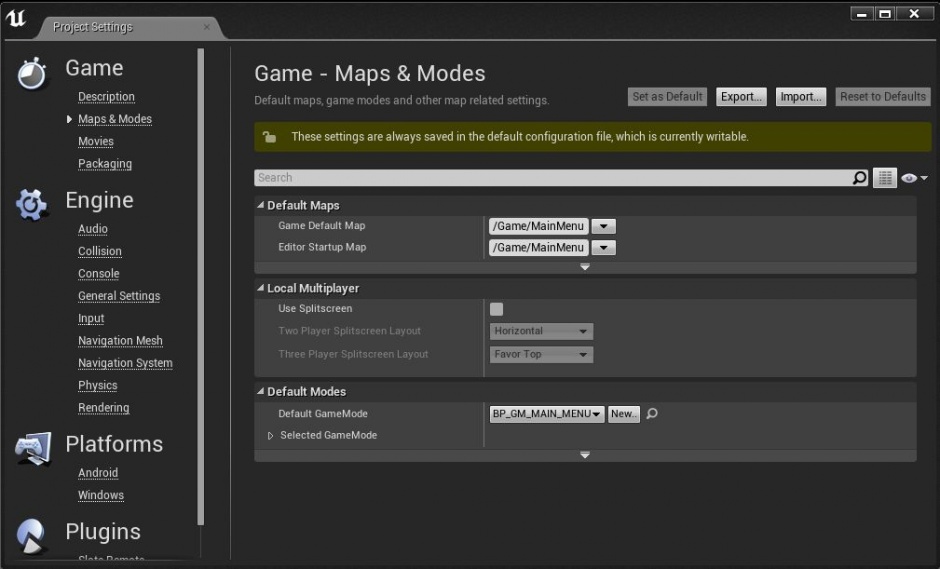
Adjust your project settings to use your MainMenu Level to start out in and your HUD GameMode Blueprint that you just created.
The Game Mode Blueprint
Open up the HUD GameMode blueprint created earlier and set up the defaults:
- Default Pawn Class
- Set this to our HUD Pawn blueprint from the dropdown.
- HUD Class
- Set this to our HUD blueprint from the dropdown.
- Player Controller Class
- Set this to our HUD Player Controller blueprint from the dropdown.
Setting Up The Textures, Font and Materials
The Textures
We need to Import the two menu backgrounds and the two button textures into our project. TODO:More explanation on this process.
The Font
First we need to create a new font:
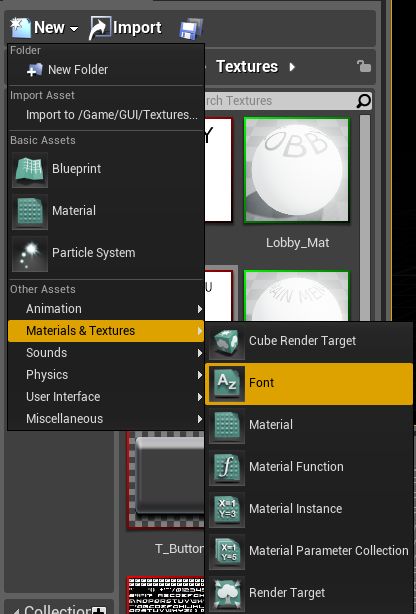
- Click new in the content explorer
- Move the mouse down to Materials & Textures and select "Font"
- Choose a Font for your menu(This will create a new font asset)
The Materials
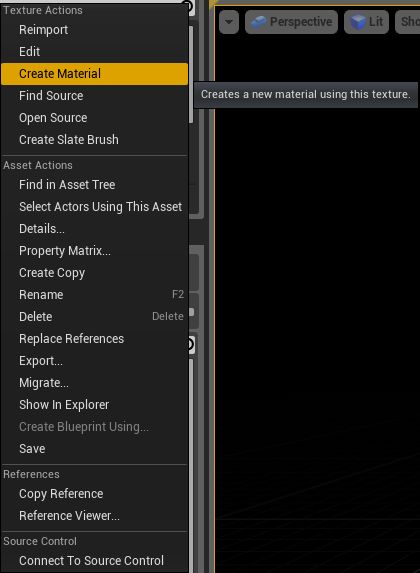
To setup the materials we need to right click on each of the menu backgrounds and choose create material.
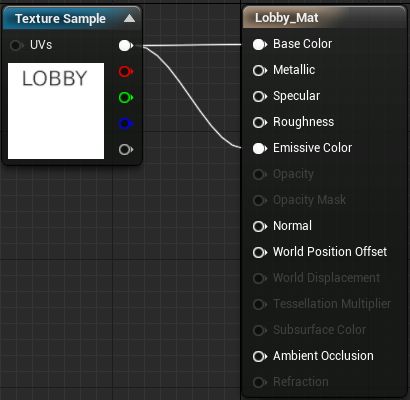
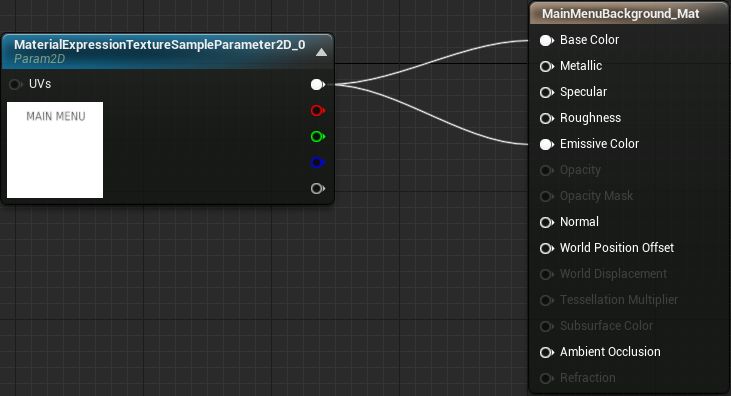
Next, we open up each of those materials and add a connection to "Emissive Color".
This will give the background some lighting.(Otherwise they just show up black)
The Player Controller Blueprint
Open up the Player Controller Blueprint. We need to add Event Begin Play here to setup the input to the HUD.
Nodes:
- Event Begin Play
- Set Enable Click Events(Box checked)
- Set Show Mouse Cursor(Box checked)
- Enable Input
- Get HUD
- Get HUD node will connect as the target of the Enable Input node so we can capture some input there.
- Connect a self reference of the Player Controller as well.
TODO: possibly need to explain how to get self reference.
The HUD Blueprint Variables And Functions
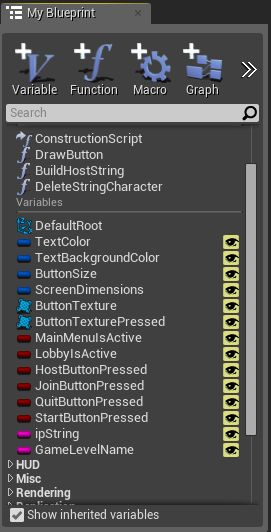
Before we go much further we need to setup some things in the HUD blueprint that are needed elsewhere.
| Variables | |||||
|---|---|---|---|---|---|
| TextColor | Linear Color | Color of text on the HUD | Default Value - Set a color and make sure alpha(A) is 1 | ||
| TextBackgroundColor | Linear Color | Background color behind IP address | Default Value - Set a color and make sure alpha(A) is 1 | ||
| ButtonSize | Vector2D | Used to store the button size | Default Value - None | ||
| ScreenDimensions | Vector2D | Stores the screen x,y size | Default Value - None | ||
| ButtonTexture | Texture2D | Reference to the button texture | Default Value - ButtonTexture | ||
| ButtonTexturePressed | Texture2D | Reference to the pressed button texture | Default Value - ButtonTexturePressed | ||
| MainMenuIsActive | Boolean | True to draw main menu | Default Value - False(No Check) | ||
| LobbyIsActive | Boolean | True to draw lobby menu | Default Value - False(No Check) | ||
| HostButtonPressed | Boolean | True if we clicked on Host | Default Value - False(No Check) | ||
| JoinButtonPressed | Boolean | True if we clicked on Join | Default Value - False(No Check) | ||
| QuitButtonPressed | Boolean | True if we clicked on Quit | Default Value - False(No Check) | ||
| StartButtonPressed | Boolean | True if we clicked on Start | Default Value - False(No Check) | ||
| ipString | String | Stores the IP | Default Value - None | ||
| GameLevelName | String | Stores the name of the Game Level | Default Value - Name of the Game Level to load. | ||
| Functions | |||||
| DrawButton | Function for drawing the button and button text. | ||||
| BuildHostString | Updates ipString variable with user input. | ||||
| DeleteStringCharacter | Deletes the last character from the ipString variable | ||||
The Main Menu Level Blueprint
In the MainMenu level blueprint we need to set the HUD variables for the correct HUD to be shown.
Note: Due to a minor bug, if the "Context Sensitive" checkbox is not checked casting won't show
The Lobby Level Blueprint
In the Lobby level blueprint we need to set the HUD variables for the correct HUD to be shown.
The HUD Blueprint Graph
Adding all the images so I can work on organization and explaining them all.
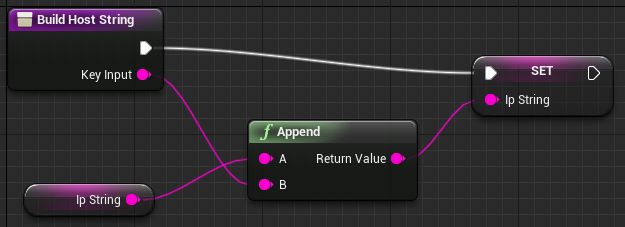
BuildHostString
Create a new function called BuildHostString, this will be responsible for adding characters to the ipString Variable.
- Add an input for a string value KeyInput.
- Drag a reference to ipString into blueprint graph and select "Get".
- Add an Append node.
- Connect ipString to the A pin.
- Connect our Key Input to the B pin.
- Drag a reference to ipString into blueprint graph and select "Set".
- Connect the return value of Append to set ipString.
- Connect the execute pin from our function call to the set ipstring.
DeleteStringCharacter
Create a new function called DeleteStringCharacter, this will be responsible for deleting the last character from the ipString Variable.
- Drag the ipString variable onto the graph and select "Get".
- Add a string Len node.(This will get the length of our string)
- Add a Integer - Integer node.
- Put 1 in the bottom pin box.
- Connect the output of Len to the top pin.
- Add a Get Substring node
- Connect ipstring to both Len and Get Substring.
- Drag the ipString variable onto the graph and select "Set".
- Connect the Return Value of Get Substring to the Set ipString.
- Connect the execute pin from our function call to the set ipstring.
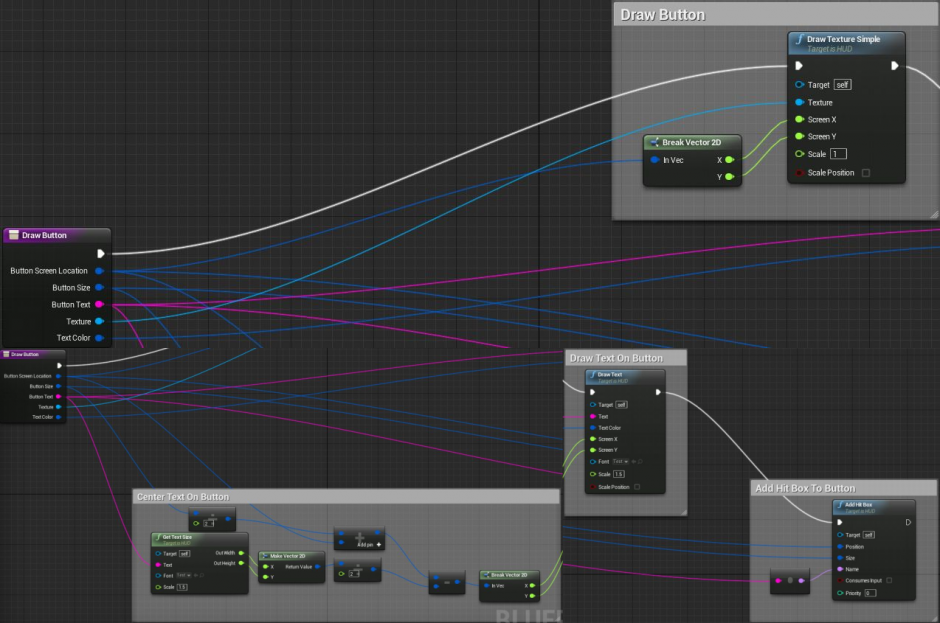
DrawButton
Create a new function called DrawButton, this will be responsible drawing our buttons.
- Add an input for ButtonScreenLocation type Vector2D.
- Add an input for ButtonSize type Vector2D.
- Add an input for ButtonText type String.
- Add an input for Texture type Texture.
- Add an input for TextColor type LinearColor.
Draw The Button Texture
- Add a Break Vector 2D node.
- Connect The Button Screen Location pin from our function to the In Vec of the Break Vector 2D node.
- Add a Draw Texture Simple node.
- Connect the X and Y pins of the Break Vector 2D node to the Screen X and Screen Y pins of the Draw Texture Simple Node.
- Connect the Execute from our function call to the input execute of the Draw Texture Simple Node.
Draw Text On Button
First we need to center the text on the button.
- Add a Get Text Size node
- Connect the Text pin to the Button Text pin of our function.
- Add a Vector2D / Float node (Divide)
- Put 2 in the float box of the Vector2D / Float node (Divide) node.
- Connect the the input vector pin of the Vector2D / Float node (Divide) node to the Button Size pin of our function.
- Add a Vector2D + Vector2D node.
- Connect the top input pin of the Vector2D + Vector2D node to the Vector2D / Float node (Divide) node output.
- Connect the bottom input pin of the Vector2D + Vector2D node to the Button Screen Location pin on our function call.
- Add a Make Vector 2D node.
- Connect the Out Width of our Get Text Size node to the X pin.
- Connect the Out Height of our Get Text Size node to the Y pin.
- Add a Vector2D / Float node (Divide)
- Put 2 in the float box of the Vector2D / Float node (Divide) node.
- Connect the Return Value from the Make Vector 2D node to the input vector pin of the Vector2D / Float node (Divide) node.
- Add a Vector2D - Vector2D node.
- Connect the top input pin of the Vector2D - Vector2D node to the output of the Vector2D + Vector2D node.
- Connect the bottom input pin of the Vector2D - Vector2D node to the output of the Vector2D / Float node (Divide) node.
- Add a Break Vector 2D node.
- Connect the input pin of the Break Vector 2D node to the output pin of the Vector2D - Vector2D node.
This X,Y now we will use to draw our text.
- Add a Draw Text Node.
- Connect the X and Y pins of our Break Vector 2D that we just made to the Screen X and Y pins of the Draw Text Node.
- Connect the Text Color pin of the Draw Text Node to the Text Color pin from our function call.
- Connect the Text pin of the Draw Text Node to the Button Text pin from our function call.
- Connect the input execute pin of the Draw Text Node to the output execute pin from our Draw Texture Simple node.
And that is it for the draw text.
Add Hit Box
To finish this function we will add a Hit box to capture the clicks.
- Add an Add Hit Box node.
- Connect the Position pin of the Add Hit Box node to the Button Screen Location pin of our function call.
- Connect the Size pin of the Add Hit Box node to the Button Size pin of our function call.
- Connect the Name pin of the Add Hit Box node to the Button Text pin of our function call(This will auto convert from string to name by adding a convert node).
- Connect the input execute pin of the Add Hit Box node to the output execute pin of the Draw Text node.
Starting Of The Graph An Setting Size Variables
- Add node Event Receive Draw HUD.
- Add a Make Vector 2D node.
- Connect Size X and Size Y to Make Vector 2D.
- Drag the ScreenDimensions variable onto the graph and select "Set".
- Connect the Return Value to the Set Screen Dimensions.
- Drag a reference from the ButtonTexture variable and choose "Get"
- Add two nodes:
- Get Size X
- Get Size Y
- Add a Make Vector 2D node.
- Connect Return Values from Get Size X and Get Size Y to the Make Vector 2D node.
- Drag the ButtonSize variable onto the graph and select "Set".
- Connect the Return Value Set Button Size.
- Add a Branch node.
- Drag the MainMenuIsActive variable onto the graph and select "Get".
- Connect Main Menu Is Active to the condition pin of the Branch node.
- The true branch will go to the draw main menu portion of the blueprint.
- The false branch will go on to the draw lobby portion of the blueprint.
Drawing The Main Menu
If our branch is true for MainMenuIsActive we want to draw the main menu.
Create the background
- Drag ScreenDimensions Variable onto the graph and select "Get".
- Add a Break Vector 2D node
- Connect Screen Dimensions to the In Vec.
- Add a Draw Material Simple node
- Connect the X of the Break Vector 2D to the Screen W pin.
- Connect the Y of the Break Vector 2D to the Screen H pin.
- Select the drop down under material and set it to your Main Menu background material.
Showing the IP that is entered
- Drag TextBackgroundColor Variable onto the graph and select "Get".
- Add 4 Make Literal Float nodes.
- Add a Draw Rect node.
- Connect the Text Background Color to the Rect Color pin.
- Connect the 4 Literal float nodes to the Screen X,Y,W and H pins.
- Add a Draw Text node
- Drag IpString onto the graph and select "Get"
- Connect the IpString to the Text pin.
- Drag TextColor onto the graph and select "Get"
- Connect the TextColor to the Text Color pin.
- Connect the same Screen X and Y you connected the Screen X and Y to on the Draw Rect node to the Screen X and Y on the Draw Text node.
- Set the Make Literal Float that is connected to Screen X to 400(This can be adjusted later)
- Set the Make Literal Float that is connected to Screen Y to 350(This can be adjusted later)
- Set the Make Literal Float that is connected to Screen W to 400(This can be adjusted later)
- Set the Make Literal Float that is connected to Screen H to 50 (This can be adjusted later)
Drawing the Host Button
- Add a Make Vector 2D node
- Set the X to 10 and the Y to 200
- Drag the ButtonTexture variable onto the graph and Select "Get".
- Drag the ButtonTexturePressed variable onto the graph and Select "Get".
- Drag the HostButtonPressed variable onto the graph and Select "Get".
- Add a Select Node
- Connect Button Texture to the Option 0 pin.
- Connect Button Texture Pressed to the Option 1 pin.
- Connect Host Button Pressed to the Index pin.
- Drag the ButtonSize variable onto the graph and Select "Get"
- Drag the TextColor variable onto the graph and Select "Get"
- Add a Draw Button node.
- Connect the Button Size variable to the Button Size pin on the Draw Button node.
- Connect the Text Color variable to the Text Color pin on the Draw Button node.
- Connect the Return Value of the Select node to the Texture pin on the Draw Button node.
- Connect the Return Value of the Make Vector 2D node to the Button Screen Location pin on the Draw Button node.
- Connect the execute pin from the Draw Text Node to the Draw Button Node
- Print "Host" in the Button Text field
Drawing the Join Button
- Add a Make Vector 2D node
- Set the X to 10 and the Y to 300
- Drag the ButtonTexture variable onto the graph and Select "Get".
- Drag the ButtonTexturePressed variable onto the graph and Select "Get".
- Drag the JoinButtonPressed variable onto the graph and Select "Get".
- Add a Select Node
- Connect Button Texture to the Option 0 pin.
- Connect Button Texture Pressed to the Option 1 pin.
- Connect Join Button Pressed to the Index pin.
- Drag the ButtonSize variable onto the graph and Select "Get"
- Drag the TextColor variable onto the graph and Select "Get"
- Add a Draw Button node.
- Connect the Button Size variable to the Button Size pin on the Draw Button node.
- Connect the Text Color variable to the Text Color pin on the Draw Button node
- Connect the Return Value of the Select node to the Texture pin on the Draw Button node.
- Connect the Return Value of the Make Vector 2D node to the Button Screen Location pin on the Draw Button node.
- Connect the execute pin from the Draw Button Node to the Draw Button Node
- Print "Join" in the Button Text field
Drawing the Quit Button
- Add a Make Vector 2D node
- Set the X to 10 and the Y to 400
- Drag the ButtonTexture variable onto the graph and Select "Get".
- Drag the ButtonTexturePressed variable onto the graph and Select "Get".
- Drag the QuitButtonPressed variable onto the graph and Select "Get".
- Add a Select Node
- Connect Button Texture to the Option 0 pin.
- Connect Button Texture Pressed to the Option 1 pin.
- Connect Quit Button Pressed to the Index pin.
- Drag the ButtonSize variable onto the graph and Select "Get"
- Drag the TextColor variable onto the graph and Select "Get"
- Add a Draw Button node.
- Connect the Button Size variable to the Button Size pin on the Draw Button node.
- Connect the Text Color variable to the Text Color pin on the Draw Button node
- Connect the Return Value of the Select node to the Texture pin on the Draw Button node.
- Connect the Return Value of the Make Vector 2D node to the Button Screen Location pin on the Draw Button node.
- Connect the execute pin from the Draw Button Node to the Draw Button Node
- Print "Quit" in the Button Text field
Drawing The Lobby Menu
- Add a Branch node to the graph
- Drag the LobbyIsActive variable onto the graph and Select "Get"
- Connect the Lobby Is Active to the Condition pin of the Branch node.
If our branch is true for LobbyIsActive we want to draw the Lobby menu.
Create the background
- Drag ScreenDimensions Variable onto the graph and select "Get".
- Add a Break Vector 2D node
- Connect Screen Dimensions to the In Vec.
- Add a Draw Material Simple node
- Connect the X of the Break Vector 2D to the Screen W pin.
- Connect the Y of the Break Vector 2D to the Screen H pin.
- Select the drop down under material and set it to your Lobby background material.
- Connect the true execute pin from the Lobby Is Active Branch node to the Draw Material Simple execute.
Only Draw Start Button For Host
- Add a Is Server Node.
- Add a Branch node.
- Connect the Return Value from the Is Server node to the Condition pin of the Branch.
- Connect the Execute pin to the Draw Material Simple Node.
Drawing the Start Button
- Add a Make Vector 2D node
- Set the X to 10 and the Y to 300
- Drag the ButtonTexture variable onto the graph and Select "Get".
- Drag the ButtonTexturePressed variable onto the graph and Select "Get".
- Drag the StartButtonPressed variable onto the graph and Select "Get".
- Add a Select Node
- Connect Button Texture to the Option 0 pin.
- Connect Button Texture Pressed to the Option 1 pin.
- Connect Start Button Pressed to the Index pin.
- Drag the ButtonSize variable onto the graph and Select "Get"
- Drag the TextColor variable onto the graph and Select "Get"
- Add a Draw Button node.
- Connect the Button Size variable to the Button Size pin on the Draw Button node.
- Connect the Text Color variable to the Text Color pin on the Draw Button node
- Connect the Return Value of the Select node to the Texture pin on the Draw Button node.
- Connect the Return Value of the Make Vector 2D node to the Button Screen Location pin on the Draw Button node.
- Connect the execute pin from the Is Server Branch True to the Draw Button Node
- Print "Start" in the Button Text field
Drawing the Quit Button
- Add a Make Vector 2D node
- Set the X to 10 and the Y to 400
- Drag the ButtonTexture variable onto the graph and Select "Get".
- Drag the ButtonTexturePressed variable onto the graph and Select "Get".
- Drag the QuitButtonPressed variable onto the graph and Select "Get".
- Add a Select Node
- Connect Button Texture to the Option 0 pin.
- Connect Button Texture Pressed to the Option 1 pin.
- Connect Quit Button Pressed to the Index pin.
- Drag the ButtonSize variable onto the graph and Select "Get"
- Drag the TextColor variable onto the graph and Select "Get"
- Add a Draw Button node.
- Connect the Button Size variable to the Button Size pin on the Draw Button node.
- Connect the Text Color variable to the Text Color pin on the Draw Button node
- Connect the Return Value of the Select node to the Texture pin on the Draw Button node.
- Connect the Return Value of the Make Vector 2D node to the Button Screen Location pin on the Draw Button node.
- Print "Quit" in the Button Text field
- Connect the execute pin from the Draw Button Node and the Is Server Branch False to the Draw Button Node
Capturing Player Input
This part is a little bit of blueprint trickery since we have no real way of handling text input yet. This will change with Unreal Motion Graphics when it is released.
- Add a Key Event for each of the keys 1,2,3,4,5,6,7,8,9,0 and ".".
- Add a Build Host String Function for each of those keys.
- Match the Key Input string to each Key Event and connect the Pressed execute pin so you have pairs of Key Events and Build host string.
- Add two more Key events for "Backspace" and "Delete".
- Add a Delete String Character Function.
- Connect the Pressed execute from both Key Events to the Delete String Character Function.
And that should be all we need for the keyboard input. When you press a number or . it should add it to the ipString variable. When you press Backspace or Delete it should remove the last character from the ipString variable.
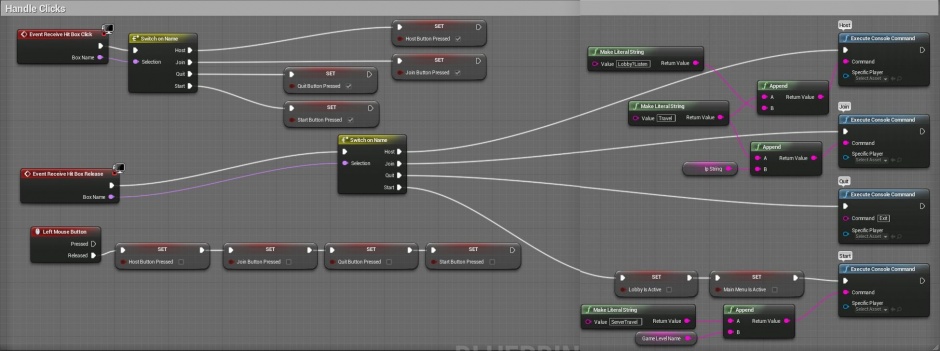
Handling The Clicks
This is where we will deal with clicks of the mouse on our menu. We are going to need three Events:
- Event Receive Hit Box Click
- Event Receive Hit Box Release
- Left Mouse Button
Event Receive Hit Box Click
- Add an Event Receive Hit Box Click node to the graph.
This is where the auto naming of our button hit boxes is convenient, we can just switch on whatever text we set on the button.
- Add a Switch on Name node.
- Connect the Box Name pin from the Event Receive Hit Box Click to the Selection pin of the Switch on Name Node.
- Under the details on the left add our button names as pins. Host, Join, Quit and Start.
This should give a Switch on Name with 4 execute outputs with the names of our buttons. For each execute pin on the Switch on Name node we need to set our buttons as pressed when it gets the click event.
- Drag HostButtonPressed variable onto the graph and select "Set".
- Drag JoinButtonPressed variable onto the graph and select "Set".
- Drag QuitButtonPressed variable onto the graph and select "Set".
- Drag StartButtonPressed variable onto the graph and select "Set".
- Connect each execute pin to the corresponding set variable and check the boxes in all four.
This will tell our HUD that a button was pressed and switch the texture.
Event Receive Hit Box Release
This is where the actual menu work gets done. We need to set up a console command for each button. We need to recreate the switch node from the Event Receive Hit Box Click.
- Add a Switch on Name node.
- Connect the Box Name pin from the Event Receive Hit Box Released to the Selection pin of the Switch on Name Node.
- Under the details on the left add our button names as pins. Host, Join, Quit and Start.
For the Host execute pin the string we want to build is Travel Lobby?Listen and pass that to a Execute Console Command node.
- Add a Make Literal String node.
- Enter "Travel "(without the quotes but with the space) into the Value box of the Make Literal String Node.
This string will be used for both host and join.
- Add a Make Literal String node.
- Enter "Lobby?Listen"(without the quotes) into the Value box of the Make Literal String Node.
Lobby is the name of the map we want to go to and ?listen means we want to start a listen server.
- Add an Append string node.
- Connect The Travel Literal String node to the A pin of the Append node.
- Connect the Lobby?Listen Literal String node to the B pin of the Append Node.
- Add an Execute Console Command node.
- Connect the Return Value pin of the Append node to the Command pin of the Execute Console Command Node.
- Connect the Input Execute pin of the Execute Console Command node to the Host pin of the Switch on Name for the Event Receive Hit Box Release.
Now for the Join Button.
- Drag ipString variable onto the graph and select "Get".
- Add an Append string node.
- Connect the ipString variable to the B pin of the Append node.
- Connect the Travel Literal String Return Value pin to the A pin of the Append Node.
This should build us the command "Travel " and then our IP the player entered.
- Add an Execute Console Command node.
- Connect the Return Value pin of the Append node to the Command pin of the Execute Console Command node.
- Connect the Input Execute pin of the Execute Console Command node to the Join pin of the Switch on Name for the Event Receive Hit Box Release.
Quit button is easy.
- Add an Execute Console Command node.
- Type Exit into the Command Box of the Execute Console Command node.
- Connect the Input Execute pin of the Execute Console Command node to the Quit pin of the Switch on Name for the Event Receive Hit Box Release.
And Our last button is the Start button, this button will move the host and any connected players out of the lobby and into the Actual Game Level.
- Drag LobbyIsActive variable onto the graph and select "Set".
- Drag MainMenuIsActive variable onto the graph and select "Set".
- Make sure both boxes are unchecked.
We have now started the Game so both menus are not being drawn until we return to one of the menu levels.
- Add a Make Literal String node
- Enter "ServerTravel "(No quotes but the space is needed) into the Value box of the Make Literal String node.
- Drag GameLevelName variable onto the graph and select "Get".
- Add an Append string node.
- Connect the ServerTravel Literal String Return Value pin to the A pin of the Append node.
- Connect the Game Level Name pin to the B pin of the Append node.
- Add an Execute Console Command node.
- Connect the Return Value pin of the Append node to the Command pin of the Execute Console Command node.
- Connect the Input Execute pin of the Execute Console Command node to the Start pin of the Switch on Name for the Event Receive Hit Box Release.
While we are here double check that you added the name of your game level that you want to load when start is pressed to the default value of the GameLevelName variable.
Left Mouse Button
We want to make sure that no matter where the mouse is when the button is released that we reset all buttons so none of them look stuck down. This we will set with the Left Mouse Button Event from the Released execute pin.
- Drag HostButtonPressed variable onto the graph and select "Set".
- Drag JoinButtonPressed variable onto the graph and select "Set".
- Drag QuitButtonPressed variable onto the graph and select "Set".
- Drag StartButtonPressed variable onto the graph and select "Set".
- Connect all four of the Set ButtonPressed nodes to each other then to the Released pin of the Left Mouse Button Node and uncheck all the boxes.
That should do it for the mouse clicks.
