Render Target Lookup
Contents
Overview
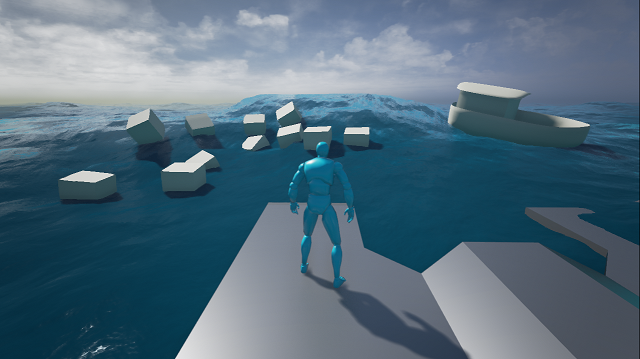
This tutorial covers a mostly blueprint, with a tiny bit of C++, approach to creating a dynamic heightmap that is driven by a material. Keep in mind that as the Unreal Engine evolves there will probably be a better technique for doing this but right now this is targeting version 4.1. There are many applications to dynamic heightmaps but this tutorial will focus on making a dynamic ocean.
Strategy
The strategy used is:
- Create an ocean material and apply to a tessellated plane.
- Render its displacement to a render target at every frame.
- Read the render target's values to a buffer at every frame.
- For every actor affected by the water, look up the current wave height in the buffer.
- Add appropriate forces to the actor.
Generating the Heightmap
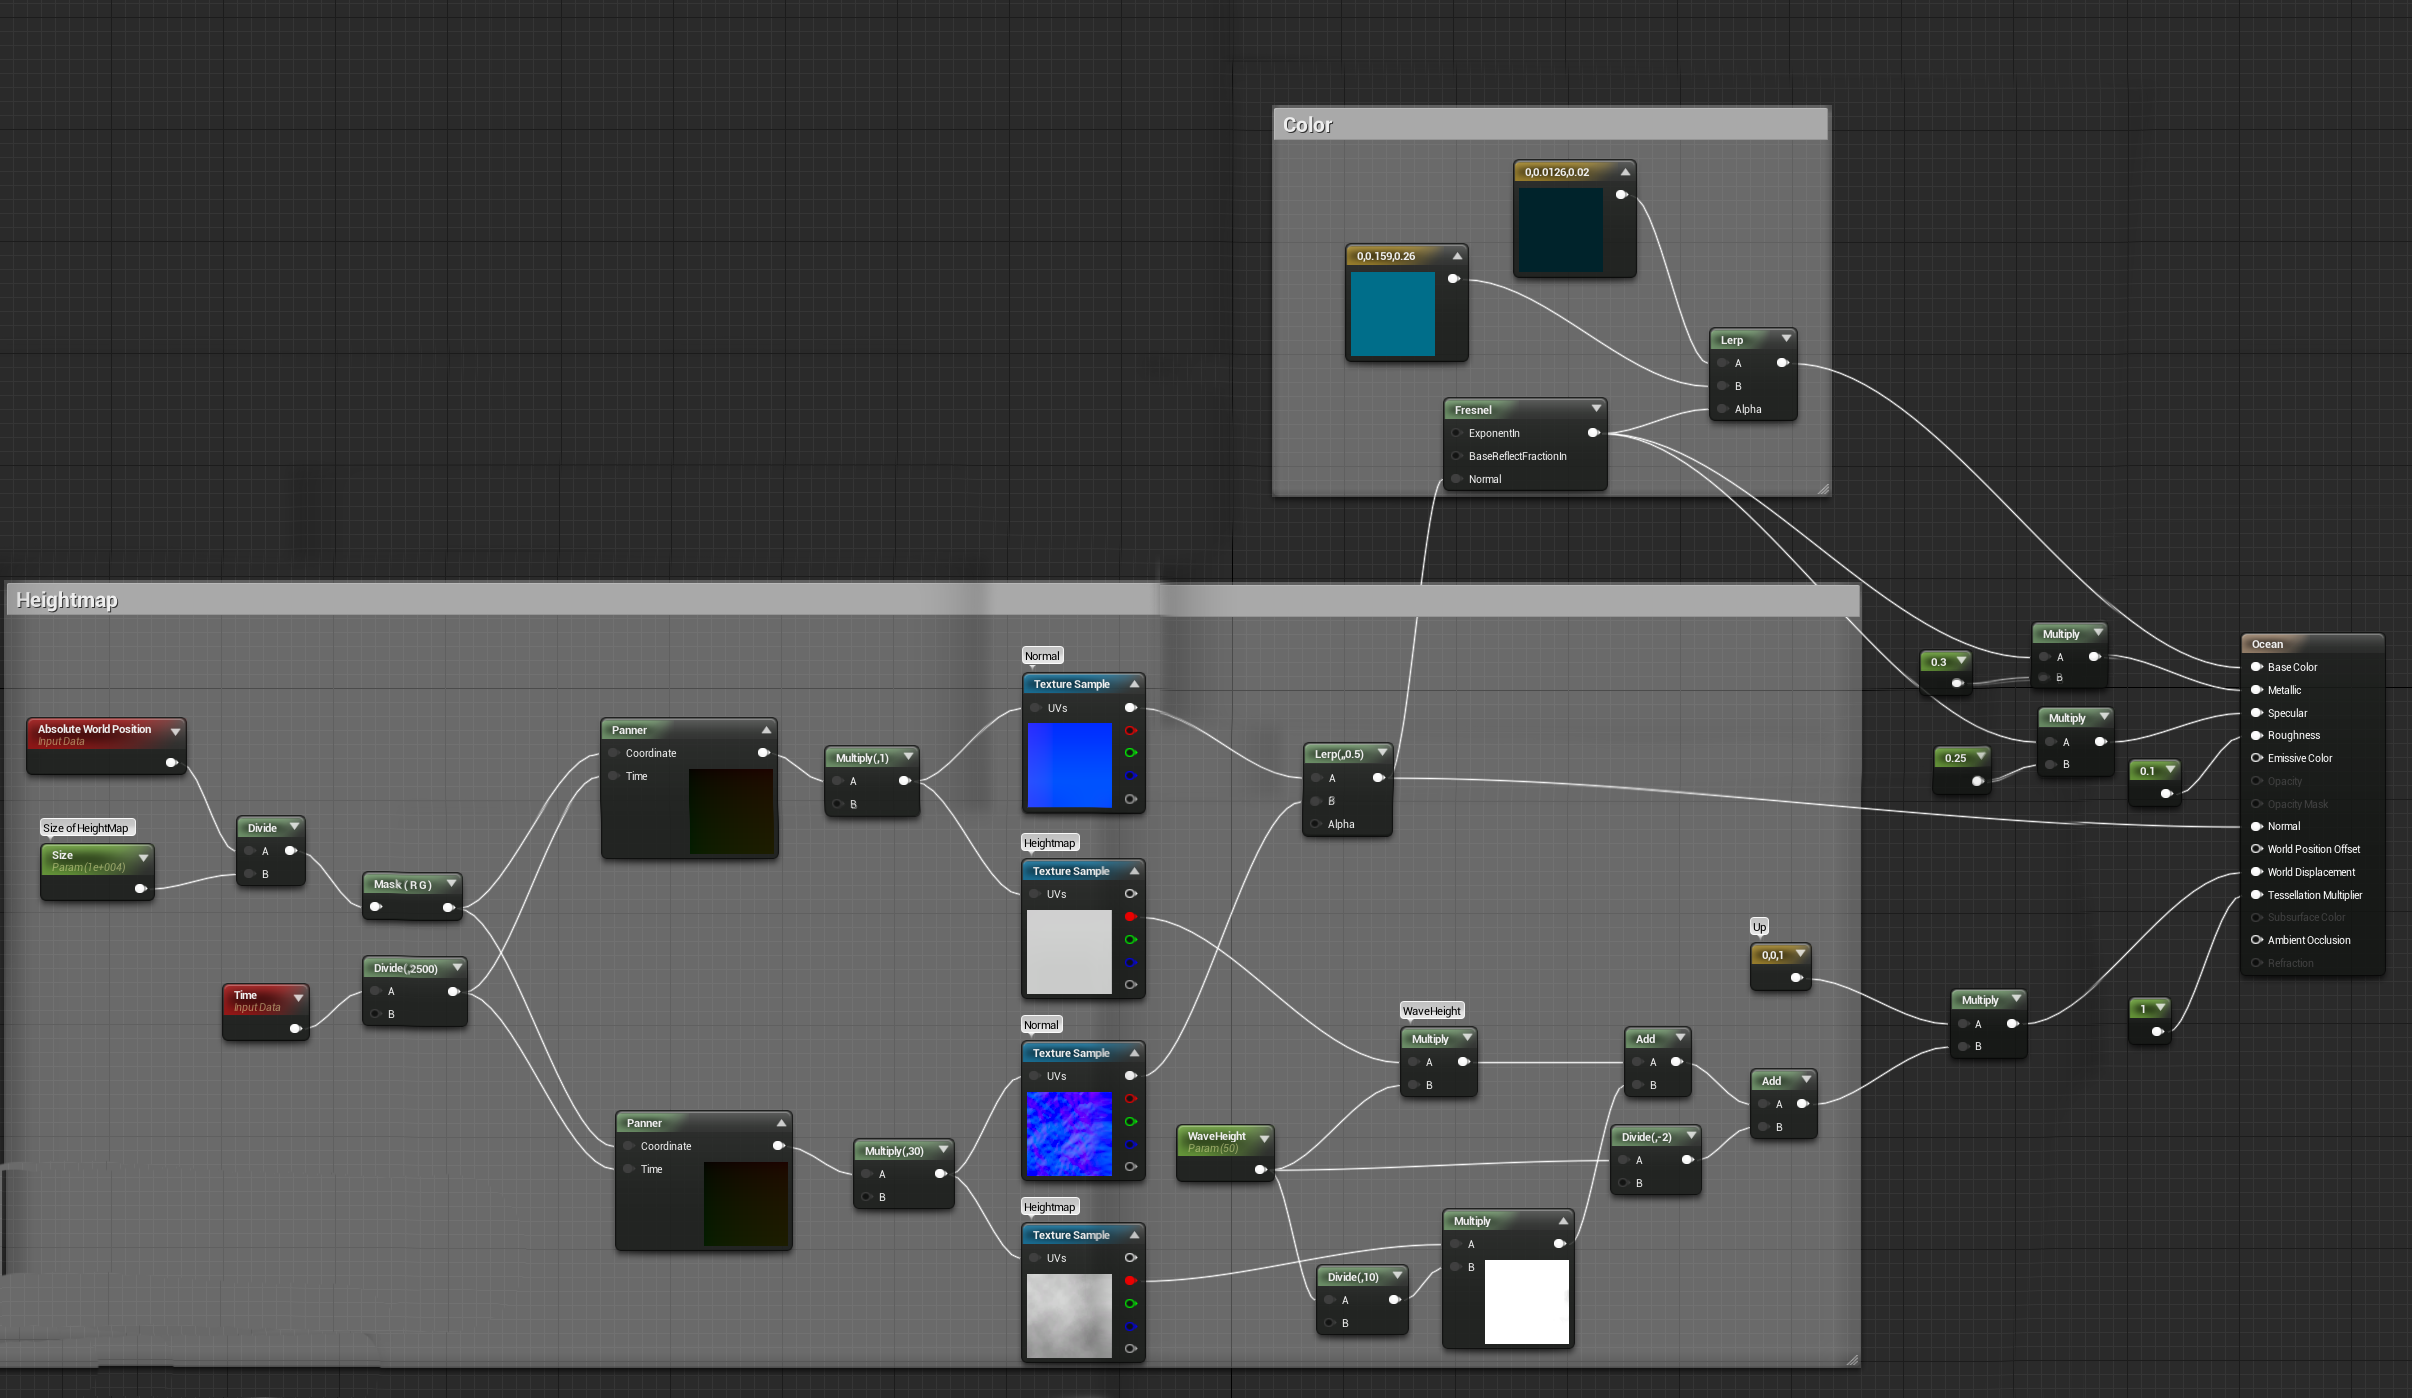
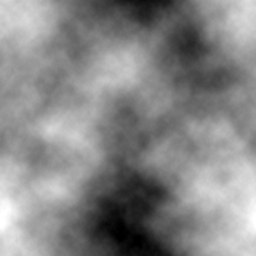
The heightmap material can be anything, in my case I used a noise normal map and bumpmap blended with itself at two different scales. The coordinates are hooked up to a panner to give the illusion of the waves moving. It is not very sophisticated but for now it does the job.
The height map is used twice, once in the ocean material with a Fresnel node connected to the diffuse channel and another material used to fill the render target that only sends the bumpmap to the emmisive channel.
Setting up the Render Target
We need to fill a render target with our heightmap. There are multiple ways to do it but I wanted to stay on the blueprint side of things as much as possible so I created an actor blueprint containing a SceneCapture2D and a MaterialBillboard. Align these two components together and and set the render target to the SceneCapture2D and you are good to go.
Do not forget to add this actor to your level.
*As of 4.13 this step can be replaced by using a "Draw Material to Render Target" node to update the render target.
Render Target Reader
This is the only C++ part of the whole tutorial. We need to be able to read the values from the render target to be able to return them your actors. The class contains two functions: Update and GetRenderTargetValue.
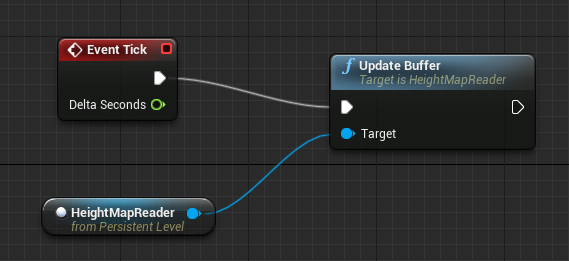
The level contains an instance of the HeightMapReader actor and Update is called at every tick. Beacause Update uses ReadPixel, it is very slow. The larger the render target the slower it gets. To mitigate this Update could not be called every frame with very little impact on the simulation. Also it is possible to only read parts of the render target and thus limit reading to only pixels that are likely to be requested by an actor.
.h
UCLASS()
class AHeightMapReader : public AActor
{
	GENERATED_UCLASS_BODY()

	UPROPERTY(Category = HeightMap, EditAnywhere)
	UTextureRenderTarget2D* RenderTarget;

	UFUNCTION(BlueprintCallable, Category = "HeightMap|Update")
	void UpdateBuffer();

	UFUNCTION(BlueprintCallable, Category = "HeightMap|Texture Helper")
	FColor GetRenderTargetValue(float x, float y);

private:

	TArray<FColor> ColorBuffer;

};
.cpp
void AHeightMapReader::UpdateBuffer()
{
	ColorBuffer.Reset();

	if (RenderTarget != NULL)
	{

		FTextureRenderTarget2DResource* textureResource = (FTextureRenderTarget2DResource*)RenderTarget->Resource;
		if (textureResource->ReadPixels(ColorBuffer))
		{

		}
	}
}


FColor AHeightMapReader::GetRenderTargetValue(float x, float y)
{
	float size = 10000;

	if (RenderTarget == NULL || ColorBuffer.Num() == 0)
		return FColor(0);

	float width = RenderTarget->GetSurfaceWidth();
	float height = RenderTarget->GetSurfaceHeight();

	//Conver coordinates to texture space
	float normalizedX = (x / size) + 0.5f;
	float normalizedY = (y / size) + 0.5f;

	int i = (int)(normalizedX * width);
	int j = (int)(normalizedY * height);

	if (i < 0) i = 0;
	if (i >= width) i = width - 1;
	if (j < 0) j = 0;
	if (j >= height) j = height - 1;

	int index = i + j * width;
	if (index < 0) index = 0;
	if (index >= ColorBuffer.Num()) index = ColorBuffer.Num();

	return ColorBuffer[index];
}
*See the section 'Non-blocking UpdateBuffer()' below for a method that is faster (or that at least does not block the game thread).
Aligning the heightmap
This is probably the most tedious part of the implementation. Depending on the mesh used as the water surface and which way the texture is oriented when rendering to render target there will be adjustments to be made to heightmap material. In my case I had to rotate it 90 degrees due to a rendering bug in the MaterialBillboard. I also needed to shift texture coordinates by (0.5,0.5). Take note that the current implementation limits the water plane to the worlds origin and the zone covered by the heightmap is only 10000 units wide.
Another useful trick to make sure everything is lined up is to create a simple black and white texture with arrows and words and use it as the bump map in the heightmap material. This allows to easily identify if something is pointing or scaled the wrong way. Also creating a grid of debug spheres set at the height returned by the HeightMapReader allows to quickly line everything up.
Using the HeightMapReader
To make my boat float, it contains a collection of test points (array of vectors) setup around its hull. I loop through each point and call GetRenderTargetValue from the HeightMapReader at the coordinates of that point transformed by the ship's transform. I then compare the height of each point with the returned height and if the value is above water I apply a downward force (gravity) at that location and if the point is underwater I apply an upward force at that location (buoyancy). These different forces will apply torque to the whole ship and make it sway and bob with the waves. To increase stability of the ship I increase linear and angular dampening based on the number of test points located underwater.
Summary
With this technique it is easy to make actors react to a dynamic heightmap generated from a material.
Here is a video of what was shown in this tutorial
<youtube>https://www.youtube.com/watch?v=7_cFo8-RkaA</youtube>
Here is a video tutorial to add buoyancy to pawns.
<youtube>http://youtu.be/kkxJeyG2whw</youtube>
There are many areas left for improvements:
- Using a faster technique to read the render target in code.
- Allow the water plane to move with the actor instead of staying at the world center.
- Interpolate the values read from the render target to get a smoother transition when a test point is located between pixels.
Due to requests, here is the water plane model used in the demo: File:WaterPlane.zip
Non-blocking UpdateBuffer()
The above code uses 'FRenderTarget::ReadPixels()', which will block the game thread until the rendering thread has caught up. This caused noticeable hiccups in my project. I worked around this by adding a modified ReadPixels() that does not call 'FlushRenderingCommands()' to my class.
Here are the relevant portions of my code. I have not tested it with the rest of the code on this page so you might have to modify it a bit to get it to work for you.
void UTargeterComponent::ReadPixels()
{
	//borrowed from RenderTarget::ReadPixels()
	FTextureRenderTarget2DResource* RenderResource = (FTextureRenderTarget2DResource*)RenderTarget->Resource;

	// Read the render target surface data back.
	struct FReadSurfaceContext
	{
		FRenderTarget* SrcRenderTarget;
		TArray<FColor>* OutData;
		FIntRect Rect;
		FReadSurfaceDataFlags Flags;
	};

	Pixels.Reset();
	FReadSurfaceContext ReadSurfaceContext =
	{
		RenderResource,
		&Pixels,
		FIntRect(0, 0, RenderResource->GetSizeXY().X, RenderResource->GetSizeXY().Y),
		FReadSurfaceDataFlags(RCM_UNorm, CubeFace_MAX)
	};

	ENQUEUE_UNIQUE_RENDER_COMMAND_ONEPARAMETER(
		ReadSurfaceCommand,
		FReadSurfaceContext, Context, ReadSurfaceContext,
		{
			RHICmdList.ReadSurfaceData(
			Context.SrcRenderTarget->GetRenderTargetTexture(),
				Context.Rect,
				*Context.OutData,
				Context.Flags
				);
		});
}
A result of this function being non-blocking is that we the result is not immediately available to us. One way to determine if the result is ready is to use a 'FRenderCommandFence'.
I added the following members to my class in my header file:
	bool bReadPixelsStarted = false;
	FRenderCommandFence ReadPixelFence;
Then I use them like this:
// to i initiate reading
	ReadPixels();
	ReadPixelFence.BeginFence();
	bReadPixelsStarted = true;
...
// To check if we are done reading:
// I do this in my tick function
	if (bReadPixelsStarted && ReadPixelFence.IsFenceComplete())
	{
              // do something with the pixels
	}
We need 'bReadPixelsStarted' since 'IsFenceComplete() returns true if it is called before 'BeginFence()'
